Thursday, June 15, 2017

Travel knitting is not a new concept... I can easily imagine settlers knitting in their Conestoga wagons as the crossed the seemingly endless prairies or immigrants filling their hours shipboard with the practical pastime. We know many people of yesteryear knit almost daily and there are many images from history of people knitting as they went about other activities.

The question for many modern knitters is not whether to knit while traveling, but what to knit along the way. A project should be small, not require more than a skein or two of yarn, not require complicated shaping or extensive charts. Some choose hats, or scarves, or baby items of one type or another (though baby blankets may be approaching the unwieldy limit) - I generally choose socks. My simple, broken ribbed sock pattern is so predictable I can nearly knit it in my sleep now. It works with both solid and variegated yarn colors so it's easy to grab a skein or two from the stash and a circular needle, stick them in a project bag, and go.

However... that's not what I did on this last trip. I was in the midst of designing a lace sock, one in which no stitch is particularly complex but with a combination of lace and cables that made keeping track of row and stitch count essential. I decided that the drive from home (Indianapolis, IN) to our campground destination (Grand Haven, MI) would be long and uneventful enough for me to get some quality knitting time as David drove. Alas, I did not take the quality of US Hwy 31 into account - the highway we were on for all but 20 minutes of the entire drive!

Now I'm a pretty good knitter, and experienced with knitting on bad roads. This was ridiculous, however. Eventually I gave up and set my knitting aside, having exhausted my willingness to pick up dropped stitches every third pothole. We stopped near the halfway point and spent the night in a Wal-Mart parking lot in South Bend, giving me time to repair the errors I'd made as I struggled with the bumpy road.

This is our second season in our travel trailer, and we love it! As one of the perks of buying (nearly) new from a local dealership, we were given access to a couple of private campground groups - one for 21 free days access and the other for 30. We won't have time to use all of that before the passes expire because they aren't really close enough for weekend trips and our opportunities to take longer vacations are limited, but we scheduled some time off and made the trek north. I have to say, it was worth the drive, even with nothing to keep my hands busy on the road!

The campground (Outdoor Adventures of Grand Haven) was gorgeous; heavily wooded, but cleared enough not to look weedy. It's near Lake Michigan - not close enough to have a view, but close enough for the daytime temperatures to be mitigated by cool breezes coming off the water. The campground had lots of activities for families (most of which didn't interest these two curmudgeons), including organized events, a huge playground, swimming pool, mini gold course, basketball, shuffleboard, and go cart racing. All except the go carts were free to members.

Memberships are expensive and include not only the buy-in but annual maintenance fees, much like a time-share association. I don't know what availability is like as a member, but online reviews are mixed. We have decided not to buy in for a number of reasons, the most compelling being the ongoing expense of membership. Since our hope is to one day be able to retire into the camper and travel for several years, any long-term financial commitments are best avoided when possible to do so. If it were a more affordable membership like Good Sam or Passport America, we might consider it.

I did get in quite a bit of knitting time and finished my sock design; here's a quick preview:


This is my second foray into a "real" published pattern. I've given instructions here for a couple designs in the past, but they were more of a recipe than a true pattern. This one will be published for sale on Ravelry after being tech edited and test knit for accuracy.

My previously published pattern is also available for purchase on Ravelry:


I have my next project on the needles now... and surprise! It's not another sock! (Stay tuned...)

Saturday, February 18, 2017

Back from Texas with a bag full of goodies!


I mentioned in my last post that I'd be stopping by my favorite yarn shop while traveling, Happy Ewe Fibers.

Happy Ewe Fibers
https://www.happyewefibers.com/
Happy Ewe is found at 18360 FM 1431 Suite B, Jonestown, TX - just north of Austin. If you're ever in the area, please stop by and mention where you heard about them! (By the way, I receive NO remuneration for mentioning them here, or for endorsing them wholeheartedly. That's all from me.)

I've recently decided to primarily work from my stash for awhile. Since I used to teach knitting at one of the chain craft stores, I have a huge stash of yarn (mostly acrylic) used to demonstrate techniques or to knit up class project examples. I'm determined to work this yarn up into donate-able scarves, hats, blankets, etc. for the homeless in our area - and I'm making progress. The cheap-yarn-stash is shrinking, though it has a way to go yet. 

I do, however, allow myself to splurge a bit when we travel. David and I tend to be a bit frugal in our spending habits day-to-day, but we both enjoy exploring flea markets, farm and hardware stores (especially locally-owned ones), and yarn shops while on the road. 

Happy Ewe Fibers, as I've said before, is my favorite. Misty and Jenny (and probably Meagan, though I haven't met her yet) are so friendly and helpful, the shop is inviting, and the yarns are decadently gorgeous! On each of my visits, a group of women were "sittin' & knittin'" in the comfy couches found at one end of the main room. A knitting class was in progress in another area of the shop, beautiful hand-knit projects were on display everywhere... and the yarn! I could have wallowed in it for ages!


In addition to yarns, knitting and crocheting notions, and patterns, they have a large section of the shop devoted to hand spinning. I know very little about this skill, but was impressed with the variety of rovings, carders, and wheels available.

So... now to the good stuff! Here's what followed me home:

Friday, February 10, 2017

Socks!

I love knitting socks!


Those who knit socks - and the blessed few that have sock knitters who love them enough to provide these practical luxuries - will tell you there's nothing like a made-to-fit, buttery-soft pair of hand-knit socks. Once you've worn a pair, you'll never like store-bought as well again. (Which is my answer to the perpetual "Why knit socks? You can buy 10 pair for $8 at Walmart.")

I put off sock projects for a long time... they intimidated me. I've been knitting for many years, but mostly stuck to simpler items. I could hardly imagine willingly casting tiny yarn onto itty-bitty needles and dealing with such mysterious ideas as "wrap and turn," "kitchener stitch," "super-stretchy cast on/bind off," "Judy's magic cast on" - not to mention the dpn-vs-circular and toe-up-vs-cuff-down controversies!

Eventually, I decided it was time to challenge myself and made a pair of worsted weight socks from some merino wool/bamboo/silk yarn I found in a bargain bin at Tuesday Morning. I used a very basic pattern - mostly stockinette with 2x2 ribbing from the ankle up, with an afterthought heel and toe... the least intimidating pattern I could find, with the exception of using the kitchener stitch to close the toe and heel. I thought they were beautiful (though now I'm sure I'd see nothing but flaws). I'd post a picture, but I gave them to Aunt Cheryl that Christmas.

I now have a couple dozen pair under my belt (not literally - that would be weird). I've mostly used wool and wool-blends, but also tried a pair from Loops & Threads Woolike acrylic. The softness of the finished product was nice, but there is very little elasticity... they're a bit saggy by the end of the day. This could probably be overcome with a different, more elastic stitch pattern if I ever decide to try them again.

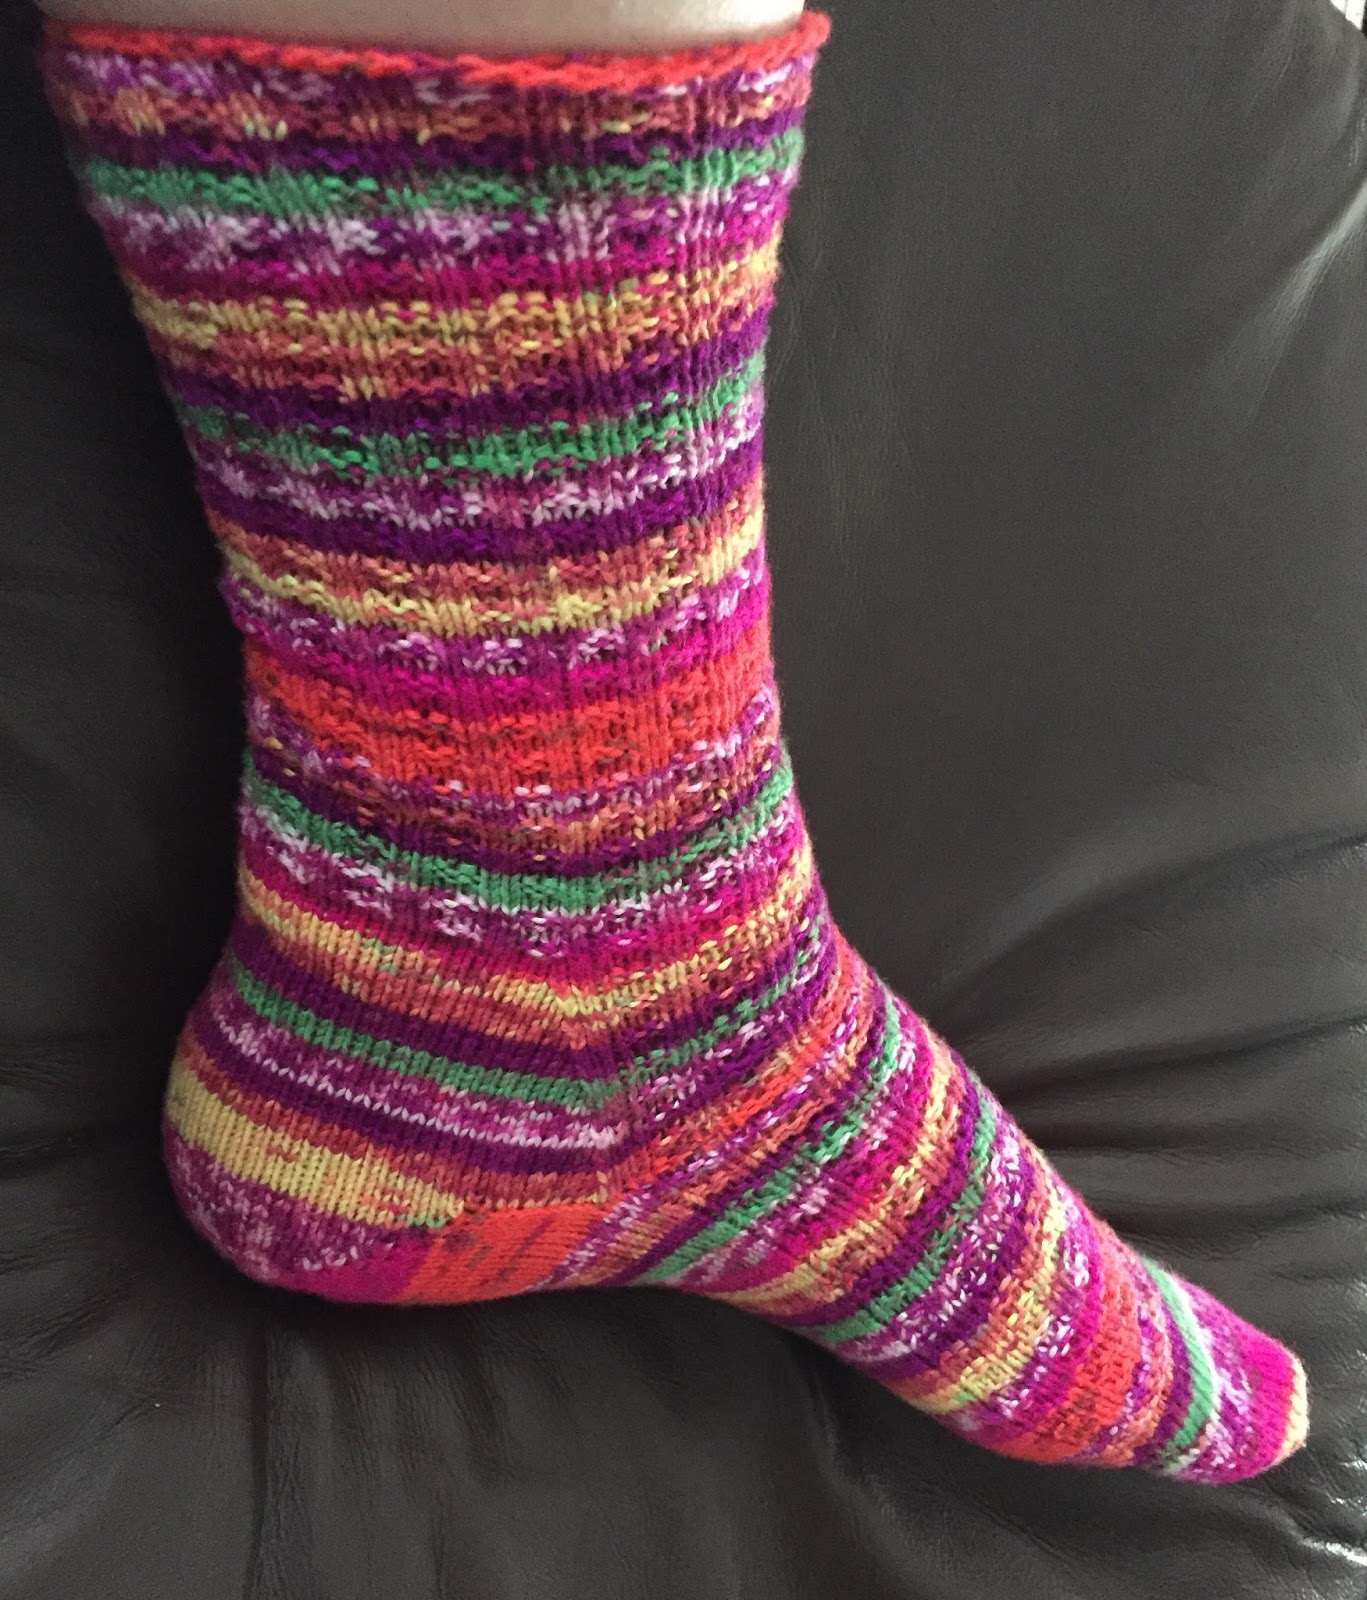
Currently on the needles is Premier Yarns Wool-Free Sock, in the color "Vegas Lights."
Fun, huh? There are other color combinations available, but this one grabbed my attention.

You can find this online at Premier Yarns. It's also available on Amazon, but only in 3-packs. Each skein is 50 g, which is enough for a single adult mid-calf sock. 

In my sock-knitting experiments, I eventually settled on toe-up knitting with a circular needle. Today I'm using a Knitter's Pride Karbonz Size 0, 12 inch needle I purchased at one of my favorite ever yarn shops, Happy Ewe Fibers of Jonestown, TX. I hope to find time to stop by again on our upcoming trip to Austin. If you're ever in the area, check them out - very friendly staff who are yarn artists rather than just salespeople, awesome selection, inviting atmosphere, and good prices (not Walmart prices, but not Walmart yarns either!). On my last visit I fell in love with their possum blend yarns from Australia - but that's a project for another post.

12 inches is a little short to be comfortable, but it's a good size for using in the car while traveling. I generally use a 16" or 24" at home. Using the longer needle makes it possible to try on your sock as you go without as much risk of dropping stitches. 

I'd suggest swatching before starting. You should swatch in the round, using the same needles and yarn you'll use for your sock. My gauge is 10 stitches and 15 rows per inch and you'll want to be close to that, but you don't have to be exact.

I don't really work from a pattern, per se... more of a recipe. Here's the recipe for my current pair:

Using the instructions for a single sock, use Judy's Magic Cast-On steps 1-10 to start the toe. I prefer to start with 12 stitches per needle rather than the 10 suggested. 

You should have your cast on row plus one round of knitting on your needles at this point. We'll begin shaping the toe with row 2, thus:

R2: Knit 1, make 1 right, knit 10, make 1 left, knit 1. Repeat.
R3: Knit.
R4: Knit.
R5: Knit 1, make 1 right, knit 12, make 1 left, knit 1. Repeat.

Continue in this manner, increasing every third row, until you have 32 stitches per needle (total of 64 stitches). If you have smaller feet, you can stop with 28 per needle, total of 56. If your store-bought socks are size 9-11, your socks will fit with either number. Just base your decision on how snug of a fit you prefer. Either way, choose a per needle stitch count divisible by 4.

Try on your sock toe. It should be loose enough to wiggle your toes easily, but not baggy. If it's not, rework it with a different pair of needles to correct the fit (ah, the power of swatching). It may hurt your feelings to frog it, but there's no sense in knitting socks you won't wear because they're uncomfortable... that defeats the best purpose for knitting socks in the first place!

You want to continue knitting rounds until the toe portion extends to the base of your big toe. Don't just hold the sock up to your foot to gauge this - try it on. You'll find the sock gets shorter and wider on your foot, so "eyeballing" it just doesn't work.

When the toe is complete, we'll begin the patterned section. 

With this brightly colored and highly patterned yarn, there's no point in a complicated stitch pattern - you wouldn't be able to see it clearly anyway. I've chosen a broken rib variation to help the sock hug my foot. The pattern doesn't continue all the way around at this point, but is only found on the top of the foot.

The pattern is a 4 row repeat

R1: Knit 1, *purl 2, knit 2,* repeat * section until 1 stitch remains on first needle, knit 1. Knit all stitches on sole of foot.
R2: Repeat Row 31.
R3: Knit all stitches.
R4: Repeat Row 3.

Continue in pattern, trying on sock from time to time. When the sock reaches the front edge of your ankle bone, it's time to start your heel.

Begin by knitting 14 rows on only your second needle. This extends the sole of your sock past the upper by about an inch. At this point, it's time to begin short row shaping of the heel cup. There are many tutorials for doing this online, but one of the best I've found is from Silver's Sock Class. Follow her instructions, but stop her "Step 4" when 11 stitches remain unwrapped, ending on a purl row. Next, follow her "Step 5" until you have picked up all wraps.  Do not continue with her instructions past this point - we are making a gusseted sock and she is not.

There's a bit of leeway in the gusset rounds. Starting from the just-completed heel, pick up stitches along the edge of the gusset while working toward the patterned front section. Pick up one stitch per gusset row, but also pick up a couple extra at each end of the gusset section. Knit in pattern across the front/top of the sock, then pick up the same number of stitches on the opposite gusset. I try to end up with 16-18 stitches on each side. Knit until you reach the patterned section, then arrange your stitches so only the patterned stitches are on needle one and all gusset and heel stitches are on needle two. 

Gusset section (3 row repeat):

Row 1: Knit in pattern for needle 1. Knit all stitches on needle 2.
Row 2: Repeat Row 1.
Row 3: Knit in pattern for needle 1. Knit 1, SSK, knit until 3 stitches remain, K2T, knit 1.

Repeat until 32 stitches remain on each needle. 

Now we'll work the leg in pattern. You may need to knit across the heel another row or two until reaching a k2, p2 row on the top of the sock. When you do, work the pattern all the way around. Continue until the leg is approximately the same length as the foot (feel free to adjust if you prefer shorter or taller socks). Try it on to decide if you like the height.

There's no need to work a different ribbing pattern because the body of the sock is already a rib knit. One of the problems many beginner sock knitters struggle with is the bind off... if you're not careful, you can end up with a sock that fits perfectly everywhere else, but you can't pull the top of it over your heel. Yikes!

I use Jeny's Surprisingly Stretchy Bind Off. It allows extra stretch right where you need it. 

Weave in your ends (weave vertically rather than horizontally to prevent tightness at the cuff).
The weird shape of the heel isn't real, I promise - it's just folded strangely in the photo.

Happy knitting!


*For some reason, the hot links don't seem to be working today. Here they are for copy/paste:

Premier Yarn: https://www.premieryarns.com/products/pwoolfrsk?variant=24360096838

Same yarn on Amazon: https://www.amazon.com/Premier-Yarn-3-Pack-Vegas-Lights/dp/B00DN4KYN8/ref=sr_1_2?ie=UTF8&qid=1486753223&sr=8-2&keywords=vegas+lights+yarn

Happy Ewe Fibers (yarn shop in Jonestown, TX): https://www.happyewefibers.com/

Judy's Magic Cast-On Tutorial: http://www.knitty.com/ISSUEspring06/FEATmagiccaston.html

Short Row Heel Tutorial (Part One): http://www.cometosilver.com/socks/2mlsocks_heel.htm

Short Row Heel Tutorial (Part Two): http://www.cometosilver.com/socks/2mlsocks_heel2.htm

Jeny's Surprisingly Stretchy Bind Off Tutorial: http://knitty.com/ISSUEfall09/FEATjssbo.php


Wednesday, December 14, 2016

An Appeal to Knitterly Folks

This winter, from what I've been told, is expected to be very harsh. The fall was long and warm, but cold weather is upon us now with about 3.5 inches of snow on the ground and an arctic blast headed our way. Tucked up in my cozy chair with central heating, a fireplace, sweaters and blankets galore, I'm well insulated from the bitter cold outdoors. (Yes, a daytime high of 20F is bitterly cold to me - I grew up in California, after all!)

My thoughts are with those who are without a warm home in this cold - and in the colder days that are coming. Homelessness will be a problem as long as mankind lives on this earth, I'm afraid. 

We knitters (and crocheters) with yarn addictions can help without incurring significant additional expenses! How many times can you make a difference in a substantive way without dipping into funds already stretched thin at this time of the year?

I've been churning out simple hats and scarves whenever I have a spare moment, stash busting and using scraps of yarns left over from other projects. I haven't photographed hats, but here is a handful of the scarves:

I sent a number of scarves, hats, gloves, and blankets to Metro Baptist Center as part of their winter drive for the homeless in Indianapolis. In addition, David and I keep hats and gloves in a bag in the trucks. If we see someone out in the cold who is without them, we stop and give them a set. If they don't feel as if they are in need, we ask them to use them for now, and pass them on when they see someone in greater need. It's a simple and quick way to make a difference - and to make those at the end of their rope feel as if they matter.

To make these scarves is simple. You'll need the following supplies:

  • Circular knitting needle, size 10, 45-60 inches long. Gauge should be about 14 stitches and 32 rows per 4" block but need not be exact.
  • Assorted yarns, approximately 6 yards each, about 350 yards total. These should be predominately worsted weight, but a few yarns of DK or bulky weight can be added to the mix - just be careful to separate them with worsted stripes. Don't worry about colors, so long as they aren't too similar - you want some definition between stripes. 
  • Crochet hook
  • Scissors
Leaving an 9" tail, cast on 250 stitches using the method of your choice. Cut yarn, leaving a 9" tail.

Join next yarn, leaving 9" tail. Knit every stitch. Cut yarn, leaving 9" tail.

Continue in this manner, changing yarn with every row and leaving an 9" tail at each end. It may help to gather these ends into a temporary loose slip knot every few rows.

Follow above pattern until scarf is 8-10 inches wide, approximately 65-80 rows. Bind off in pattern. When it's off the needles, you may be surprised at the length... don't be. We want it long enough to wrap all the way around the lower face and neck, then be knotted together in front to cover the stomach and chest.

To finish, pull end stitches of first two rows tight, then knot them tightly together. Continue across both ends of the scarf, then trim fringe to even length of approximately 8". Alternatively, weave in all those ends - the choice is yours.

Find someone shivering and give them the scarf - what could be simpler?

Yet Another Knitting Blog!

Knitting blogs seem to come and go at an almost alarming rate.

It's understandable, in a way... time spent blogging is time that could be spent knitting!

Knitting appeals for many reasons.

  • My father, who has since passed on, taught me. With needles in my hands, I feel his influence in a very real way. 
  • Every project is unique. Even when working from a pattern, my version will be slightly different from any other. Every time I turn out something new, I realize a bit of my artistic potential.
  • To quote a popular knitting meme, "It's not a hobby; it's a post-apocalyptic life skill." Knitting is more than a pastime because I can produce useful items.
  •  Knitting expresses love in a tangible way. Wrapping a scarf or blanket around your shoulders makes you feel completely loved by the one who made it with you in mind.
  • Knitting is portable. Please note that by this I don't mean all knitting is always portable, but that it's possible to carry many types of projects with you to help pass otherwise wasted time. I frequently have a sock, hat, or scarf project with me to work on while waiting for a restaurant meal, in the doctor's waiting room, or during travel time while David is driving. I would not attempt this with larger or more complex projects.
  • There are always new yarns and new designs to try. If I get bored with one pattern, I can always find something new!
  • Hand-knit socks. Need I say more?

In this blog, I'll share knitting projects, patterns, yarn reviews, discussions of favorite designers, stitch patterns, techniques, tips, and more. I'll link to related sites I find interesting, entertaining, or otherwise worth visiting.

How about you? 
What drew you into knitting? 
How did you learn? 
Is there a specific topic you'd like to see here?

Please leave your comments below.